Your cart is empty
Tax included and shipping calculated at checkout

Drawer menu
Tax included and shipping calculated at checkout


Curlura is dedicated to helping you achieve healthier, more defined curls with premium hair care essentials. From nourishing shampoos and hydrating conditioners to curl creams, styling gels, and treatments, every product is selected to hydrate, strengthen, and enhance your natural texture. We make it easy to build a curl routine that delivers beautiful, confident results every day.
Absolutely love these products! My curls have never looked better. The formula is lightweight yet nourishing, and the scent is divine. Highly recommend to anyone with natural curls.
Finally found a hair care line that understands my curls! The moisture retention is incredible and my hair feels so soft. This is now my go-to brand.
Game changer for my natural hair journey! The products are luxurious, effective, and made with quality ingredients. My curls are defined, bouncy, and healthy.


Clean, nourishing formulas that deliver beautiful results without harsh ingredients.
Natural Ingredients
Curl Definition
Deep Hydration
Lightweight Formula
Feature text 1
Feature text 2
Feature text 3
Feature text 4
Feature text 1
Feature text 2
Feature text 3
Feature text 4


Discover our most-loved curl care essentials, trusted by customers to hydrate, define, and strengthen every curl. Shop the favorites that deliver healthy, beautiful results with every use.
Our mission is to make curly hair care simple by providing quality products you can trust, along with helpful guidance to support your hair journey. Whether you're looking to reduce frizz, boost moisture, or enhance your natural texture, Curlura is here to help you achieve healthier, more beautiful curls every day.


Few phrases in the curly hair world spark as much excitement (and confusion) as "wash and go." It's the low-maintenance, high-impact routine every curly girl dreams of — wash your curls, apply product, let them dry, and go. No braid-outs, no twist-outs, no hours of styling. Just your natural curl pattern, fully defined.
But here's the truth: a great wash and go routine for beginners isn't as simple as slapping on gel and walking out the door. There's a specific order of products, a technique that makes or breaks your results, and a handful of mistakes that turn a "wash and go" into a "wash and... why does this look like a bird's nest."
This guide breaks down exactly what you need, the order to apply it in, and the mistakes to avoid — so your first wash and go actually turns out the way it does in your head.
A wash and go is a curly hair styling method where you cleanse, apply your styling products, and let your curls air dry or diffuse into their natural pattern — no additional manipulation, sectioning, or overnight styling required. It's the fastest way to get defined curls with minimal effort, which is exactly why it's the go-to starter routine for anyone new to embracing their natural texture.
Your essential wash and go starter kit:
Section your hair into 2–4 parts and cleanse with a sulfate-free shampoo or cleansing conditioner, focusing on your scalp. Detangle gently with your fingers or a wide-tooth comb while conditioner is still in your hair to minimize breakage.
Rinse thoroughly, finishing with cooler water if you can stand it — this helps close the cuticle slightly and adds shine, setting the stage for better product absorption in the next step.
This is the most important rule of a successful wash and go: never let your hair start drying before you apply product. Work in small sections, applying leave-in conditioner first, followed by your curl cream, and finishing with gel to lock everything in place.
Scrunch product upward into your curls in small sections rather than raking it through from root to tip. Raking stretches and separates curl clumps, while scrunching encourages them to form naturally.
Plop your hair in a microfiber towel or cotton t-shirt for 10–15 minutes to remove excess water, then either air dry completely or diffuse on low heat until fully dry. Avoid touching your curls while they're drying — this is where most frizz sneaks in.
Once your hair is 100% dry, gently scrunch out any gel cast with dry hands or a small amount of oil to reveal soft, touchable, defined curls.
Waiting too long after rinsing means your hair starts drying before product goes on, resulting in less definition and more frizz. Apply products immediately after rinsing, while hair is still dripping.
Going straight to gel without a leave-in often leaves curls feeling dry and stiff underneath the gel cast. Leave-in conditioner is what actually provides lasting moisture.
It's tempting to check your progress, but touching curls mid-dry disrupts curl clumps and is one of the top causes of frizz in a wash and go routine.
Breaking the gel cast before hair is completely dry causes frizz and undoes your definition. Always wait until hair is 100% dry before scrunching out any crunch.
Expect your first few attempts to take 45–90 minutes including drying time. As you get more comfortable with product amounts and technique, the process becomes much faster.
Yes — fine or low-density curls typically do best with lighter product amounts and a diffuser to add volume, rather than skipping the routine altogether.
Most wash and go styles last 3–7 days with proper nighttime protection and light refreshing, depending on curl type and porosity.
A wash and go doesn't have to be intimidating. With the right products, the correct application order, and a little patience while your curls dry, you'll go from "beginner nerves" to "why did I ever style my hair any other way." Trust the process, resist the urge to touch your curls while they dry, and let your natural texture do what it does best.
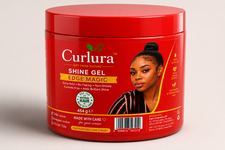


Nourishing essentials designed to hydrate, define, and bring out your curl’s true beauty.